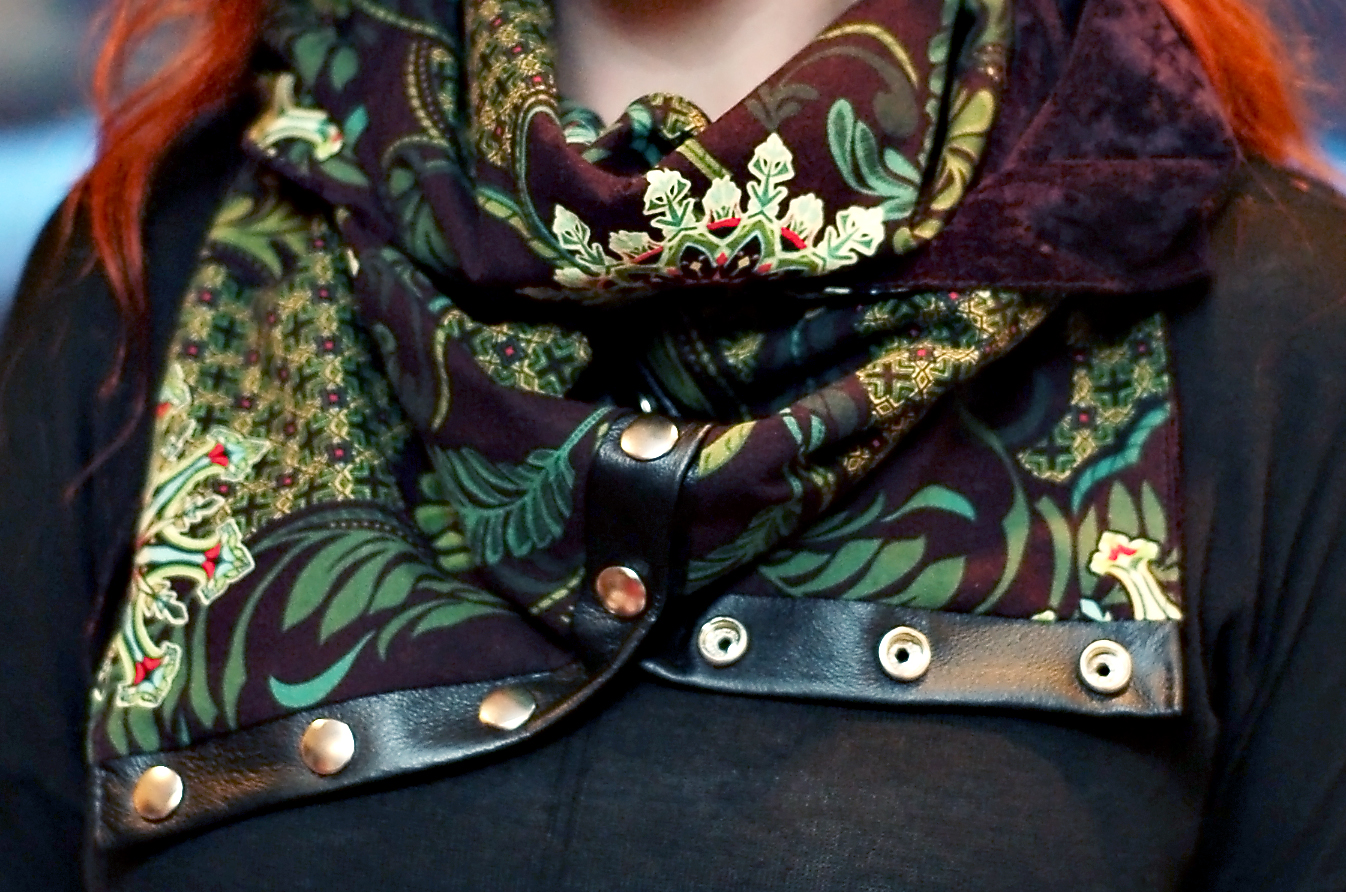
I saw this scarf on Pinterest, and thought it was a really cool concept. I love the leather with the snaps for an infinity type of scarf.
I had some really pretty quilting cotton that I thought would work GREAT for this project. I also had some black, ugh…I can’t think of what this type of fabric is called. It’s not velvet, not ultra-suede…maybe non-stretch velveteen? It is low pile and thinner than velvet would be, but it has that type of look.
I have lots of pieces of leather, so this was a project from my “stash”. The only thing I had to buy were the snaps, which were about $7 at Joann’s. I looked at the leather pieces at Joann’s and holy heck are they spendy for not much. I would suggest either forking over the dough for a hide online or get a used leather jacket/skirt/pants at a thrift store. The leather I used here was from a black leather coat that I have used for several projects so far. You could use pleather, too, if you want it to be vegan.
Okay, so here is the tutorial…
Buy/Need:
2 types of fabrics, or one if you want both sides to match.
Leather
1 package of post snaps with 7 snaps included (look at the package, some only have 6 snaps. You can still make that work, though.)
Cut:
Quilting Cotton – 60″ x 15″
Velveteen – 60″ x 15″
2 x Leather pieces – 3″ x 15″
Sew:
1. Cut out your fabrics and leather.
2. Attach the leather pieces to the ends of the the velveteen and then quilting cotton. You will have a big circle.
3. Lay the scarf flat, right sides together, so that the leather meets at the seams and you have even amount of leather on either side of the scarf. Don’t use pins on the leather. I use Clover Clips, but a paper clip works good, too.
4. Sew up all of one side. The opposite side, leave a hole so you can pull everything through to the make the right side out.
5. Clip the corners so they will turn out flatter.
6. Pull the fabric through, and press with an iron. Don’t put the iron directly on the leather/pleather. I just use a cloth. I won’t press totally flat, but it will be a little flatter. Press the hole well so the seams meet up.
7. Topstitch both sides of the scarf edges. I didn’t topstitch the leather along the bottom edge, but you can if you want to do that, too. I figured the snaps would keep it flat enough.

8. Mark the spot for the snaps. I went in one inch from the edge and then every two inches. This resulted in needing 7 snaps.
9. Now put in the snaps. Here is where you need to be careful in what you buy. Make sure they are not the little ones with teeth, as they won’t punch through the leather. You need the ones with the big post.
Make a hole in the leather. I have a leather punch, but you can use an exacto knife, an awl or just scissors. The leather punch works best, though.
10. Now put in the snaps according to the directions. I used the kit that the snaps came with, but not all sets come with a setting kit. Make sure you get a kit, so you can put them in. Also, make sure when you are putting in the opposite side that it is going to snap on the correct side without a twist in the fabric. You don’t want to mess up this close to the end!
Look at that…all done!
I love this scarf and I think it would be a good gift. It is original looking and very cool. You can totally choose the fabric for your gift recipient’s personality.
Let me know if you make a scarf…I’d love to see it!


After making quilts for a number of years, I decided I needed to ‘wear’ my quilts. I made 2 vests – this blue one and a black one from pieces from my stash. I used snaps for closure.
LOVE it!!! 😉